Monday, March 26, 2012

Stuffed Peppers

Not sure what got into me the last few weeks but I had it in my head that I was going to make stuffed peppers. I have this feeling it was because my mom told me she made some a while back and I thought it would be a good way to get some move veggie in my diet. (Diet here being how you eat as a whole, not something you do for a month before you go to a wedding or reunion.)
Thank you once again to Pintrest I found many stuffed pepper recipes but I went with the one below.
Here is the original website and the original recipe and then I'll tell you what I did differently after the pictures.


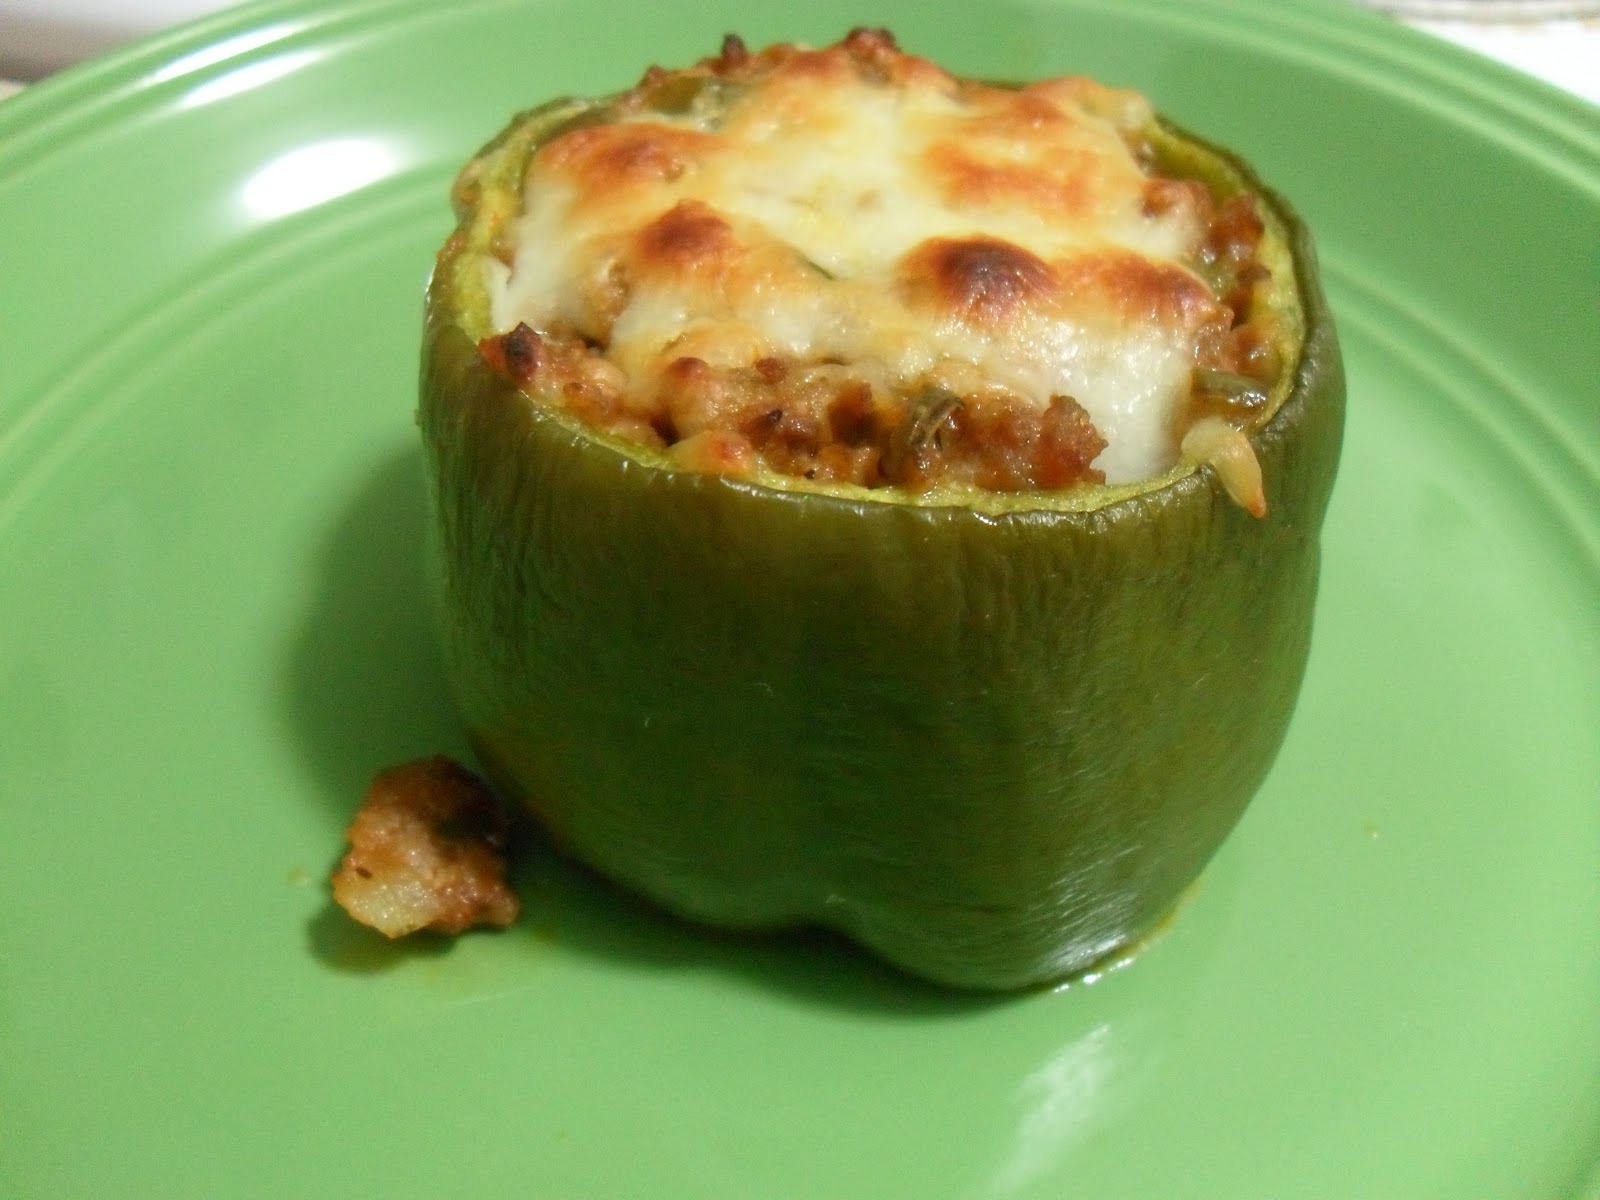
Stuffed Peppers Recipe with Turkey Italian Sausage, Ground Beef, and Mozzarella


This makes six stuffed peppers.


Ingredients:
6 red or green peppers, or a mixture of colors
1 pound extra lean ground beef (called beef mince outside of the U.S.)
1 pkg. (5 links/19.5 oz) turkey Italian sausage (hot or mild, but I prefer hot)
1 cup diced onion (1 medium onion)
1 cup diced red pepper (tops of peppers)
4-6 tsp. olive oil for browning meat and veggies
Vege-sal to season meat (or use salt)
fresh ground black pepper, to season meat
1 cup (or slightly more) spicy tomato sauce with basil (I use my own Marinara sauce from the freezer so I know it is sugar free. Bottled sauce is fine, but check the label to get the one that is lowest in sugar.)
2 cups grated low fat mozzarella cheese (I used skim milk mozzarella cheese with 5 grams fat per ounce)
1/2 cup grated Parmesan (optional, you could use a little less mozzarella if adding this)

Instructions:
Preheat oven to 375F/190C. Cut tops off peppers, making a deep enough cut that you have some pepper to chop for the filling. Square off the bottom of each pepper to make them stand up. (It's nice to have a small hole in the bottom so any extra fat can drain out, and cutting off the bottoms also accomplishes this.) Clean out inside of peppers and wash if needed. Choose a pan that will keep the peppers standing upright and spray with olive oil or nonstick spray.

In very large frying pan, heat a small amount of olive oil and cook hamburger until lightly browned. (I use my turner or a potato masher to break up the meat into smaller bits as it cooks.) Put the browned meat in a colander or fine-mesh strainer, rinse with very hot water to remove fat, and let drain. In same frying pan, add a tiny amount of olive oil, squeeze turkey sausage out of links, and cook until lightly brown. Add to hamburger in colander and rinse again. 

Add a bit more oil to pan and cook chopped peppers and onions for about 3-4 minutes, until barely starting to soften. Turn off heat and put meat back into pan with peppers and onions. Add about 1 cup tomato sauce, just enough to barely moisten the mixture. Season mixture with salt and pepper to taste. Let mixture cool slightly, then mix in cheeses, saving about 1/4 cup Mozzarella for the top of the peppers.

Put the peppers in the pan standing upright. Stuff each pepper with meat/veggie/cheese mixture, using a large spoon and pressing in tightly until you use all the filling. Put a pinch of Mozzarella cheese on the top of each pepper. Cover the dish loosely with foil, tenting it up so it doesn't touch the tops of the peppers.

Bake, covered with foil about 30 minutes. Take off foil and bake about 20 minutes more, until cheese is melted completely and top is slightly browned. Serve hot.

This freezes well, so even if you're only cooking for one or two I recommend making the full amount and stashing some in the freezer for lunches or easy dinners another time. 


Now to use up some stuff that I had in the freezer, I used some local beef from the farmers market so I'm pretty sure the fat content was higher than the original recipe but the cows grew up about 30 minutes from where I live and were 100% grass fed; the way meat is suppose to be. And instead of using turkey sausage I still had some Johnsonville Italian sausage in the freezer so I used it. I also didn't rinse my meat after cooking it cause fat is flavor and I wanted the flavor in my dinner, not down the drain. 
Like the recipe suggest I did cut the bottoms off of my peppers but in some cases I went a little over board so a couple peppers didn't really have bottoms but it's ok cause the meant still stuck together and you're going to cut the thing up to eat it anyway.
I also only used green peppers instead of a mix of red and green because I liked the look of the green peppers at Bi-Lo better.


I do have to say this. I am not a huge fan of pepper, or at least raw peppers, so the idea that I had a hankering for these was strange enough. The fact that they were so yummy that I am going to add them into my recipe book is even more bazaar. If you're more worried about the dish's fat content that you are about cleaning out your freezer than shop around for the lean beef and the turkey sausage. Me? I wanted to be a bit frugal this time.

Friday, March 23, 2012

Devilish Chocolate Cola Cake

I have been making this cake since high school and it is always a hit, especially with chocolate lovers. I am also going to go ahead and admit that this picture is not from the last time I made this cake, it is from the time before that. I really didn’t like how the frosting turned out this last time so I am using an older picture. Usually when I make this cake the frosting is more of a glaze and this time it really was more of a frosting. I believe what happened was the butter used was starting to cool off thus making the topping thinker and causing it to be a frosting consistency rather than a glaze consistency.  Either way it is really yummy but I prefer the glaze topping. (Oh and yes, the ice cream in the picture is also home made. I’ll post an ice cream recipe in a few weeks once I have the time to make some.)


Chocolate Cola Cake

Cake:
One 18.25 ounce package Devil’s Food Cake Mix without pudding
One 3.9-ounce package Chocolate instant pudding
4 large eggs
One 10 ounce bottle cola flavored beverage (1-1/4 cups)

Preheat oven to 350F. Combine first 4 ingredients in a bowl. Beat at low speed with an electric mixer until blended; set aside. Bring cola to a boil in a small sauce pan over medium heat. With mixer on low speed, gradually pour hot cola into cake batter. Increase speed to medium, beat 2 minutes. Pour batter into a greased and floured 9 x 13 x 2 inch baking pan. Bake for 30 minutes, or until a wooden pick inserted in center comes out clean. Cool in pan on wire rack 10 minutes. Spread chocolate-cola frosting over top of warm cake, cool cake completely on wire rack.

Frosting:
1/2 cup butter or margarine
6 tablespoons Cola-flavored carbonated beverage
3 tablespoons cocoa
One 16-ounce package powdered sugar, sifted
1 teaspoon vanilla extract
1 cup chopped pecans

Combine first 3 ingredients in a large sauce pan; cook over medium heat, stirring constantly until butter melts. (Do not boil). Remove from heat. Add powdered sugar and vanilla, stirring until smooth. Stir in pecans. Spread on warm cake.

Serves 15.

Really the pecans are optional. I've made it without before, so if you have an allergy or if you just don't like nuts in your dessert feel free to leave them out! I love pecans though and sometimes I add a little more than what is called for.


---Dare to Cook---

Monday, March 12, 2012

Breakfast Cookies

These delicious lovelies are from a book called The Athlete's Palate Cookbook. My brother gave it to me a couple Christmases ago when I was really starting to get active and watch what I eat. The recipe in the book is called Quinoa Cookies but since they are in the breakfast part of the book and that is when I will be eating them, I have named them Breakfast Cookies. You call them whatever you want.
This recipe makes about two dozen (24) cookies. I made 23, oops.

Ingredients:
1/2 cup butter
1/2 cup brown sugar
1 egg, beaten
1/2 cup unbleached or all-purpose flour
1/2 quinoa flour
1/4 teaspoon salt
1/2 teaspoon baking soda
1/2 cup regular oats (not instant)
1/2 cup fruit granola

Directions:
Cream the butter and brown sugar. Combine the vanilla and egg and add to the butter mixture. Sift the flours, salt, and baking soda and fold into the butter mixture. Fold in the oats and granola.
Roll the dough into a log shape (I found putting on a rubber glove at this point helped a lot) about 1.5 to 2 inches in diameter using plastic wrap. Freeze for 20 minutes or until firm enough to slice. When you're ready to take it out of the freezer, pre-heat the oven to 350F. Slice dough into 1/2 inch rounds. Place on a lightly greased baking sheet; you can also use parchment paper or a reusable silicone baking mat like I do. Bake 15 to 20 minutes, or until crispy on the outside but still moist on the inside.

Each cookie does have about 100 calories but they are from an athlete cookbook and they are meant for breakfast so they will give you that boost in the morning.


---Dare to Cook---

Navajo Beef and Chile Stew - Crockpot

Who wants more crockpot cooking? I DO!!
This one is from a healthy crockpot cookbook. I used the prep-a-head-and-freeze method for this recipe.

3/4 pound lean beef stew meat, cut into 3/4-inch cubes
1 large onion, chopped
2 large cloves garlic, minced
1 (14.5oz) can of ready-cut tomatoes with juice
1 (7oz) can diced green chiles, drained
1 (8.5oz) can whole-kernel corn, undrained
1.5 teaspoons dried oregano leaves, crushed
1 teaspoon ground cumin
1/2 teaspoon salt
1/4 teaspoon ground red pepper
2 tablespoons yellow cornmeal

Combine all ingredients, except cornmeal, in a 3.5 quart slow cooker, mixing well. Cover and cook on low 7 to 8 hours or until meat is tender.
Turn control to high. Stir in cornmeal. Cover and cook on high 20 to 25 minutes.

Approx 292 calories per serving, too bad the book doesn't tell you how much a serving size is.

I actual like to pear it with mashed potatoes. Yum!


---Dare to Cook---

Friday, March 2, 2012

Mini Corn Dog Muffins

The original recipe calls them Corn Dog Mini Muffins but for some reason Mini Corn Dog Muffins sounded better to me so that's what I have been calling them. 
Here is the link to the original recipe. (I'm trying to do this whenever possible now so that I know people are getting credit.)  http://happygoodtime.com/2012/02/01/corn-dog-mini-muffins/


Just so you know. If you couldn’t tell, you will need a mini muffin pan.

Ingredients:
§  1 package mini hot dogs or regular hot dogs cut into 1 inch pieces. Make sure you get fully cooked hotdogs or you cook them before hand. I also made some with veggie dogs so that they would be a vegetarian option.
For the cornbread mix:
§  1 cup all purpose flour
§  1 cup cornmeal
§  1 tablespoon baking powder
§  2 eggs
§  1 cup milk
§  1/3 cup unsweetened applesauce (vegetable oil or butter as a substitution are fine)
§  1/4 cup sugar
§  1/4 teaspoon salt

Directions:
§  Pre-heat your oven to 400 degrees F
§  In a large mixing bowl stir together flour, cornmeal, salt, and baking powder
§  In a separate bowl whisk together eggs, milk, applesauce and sugar
§  Gently mix together wet and dry ingredients, stirring only to coat. Be careful not to over mix here or you will have tough, dry muffins. Just like with biscuits/scones the key is to be gentle with the batter. There will be small lumps in your batter, and that is perfectly fine.
§  Prepare your muffin tin by spraying liberally with cooking spray. If your pan has the tendency to stick, consider using mini muffin liners.
§  Using a tablespoon, fill each muffin cup 3/4 full. Be sure not to fill all the way to the top.
§  Insert 1 hot dog piece into each muffin
§  Bake at 400 F in the center of your oven for 10-15 minutes or until a toothpick inserted in the middle of a muffin comes out clean
§  Remove from pan while still very warm to avoid over-cooking


Here is a little tip based on what I did. Since I was making these for a party that I had to travel close to an hour to and I didn’t want these little beauties to be cold by the time I got there, after I mixed the batter I put it in a zip top bag for travel. I also went ahead and cut all the hot dog and veggie dog pieces before I got on the road and put them in zip top baggies too (labeled meat and veggie of course). When I got to where I was going having the batter in a baggie really helped with filling the muffin pan. I just snipped the corner off and basically used it as a piping bag to fill each muffin space. When they were done I simply used two forks to pull each muffin out of the pan. And since this recipe makes 28 and my pan only holds 24 I had to make four more and put the pan back in the oven. But all the work was worth it because these little lovely are simply yummy. Serve with whatever you’d put on a corn dog. I stuck to ketchup and mustard even though most of the people eating them didn’t use any. They are just that good. Ha!


Yummy!!


---Dare to Cook---