Sunday, September 16, 2012
The Pampered Chef
This is a shameless plug. In order to help ends meet while I am in school I have signed up to be an independent consultant for The Pampered Chef. Please keep me in mind for all your kitchen instrument needs and check out my personal website to browse the catalog and pick up any goodies that might catch your eye. I'm also available for cooking shows and catalog shows.
http://new.pamperedchef.com/pws/krispyjones
--Dare to Cook--
Thursday, September 6, 2012
Beef Stew with Fennel and Shallots

Beef Stew with Fennel
and Shallots
I personally love this stew. It was my first (and so far
only) exposure to fennel and the only thing I will willing put mushrooms in.
Ingredients:
3 tablespoons all-purpose flour
1 lb boneless lean beef stew meat, trimmed of visible fat and cut into 1.5 inch cubes
2 tablespoons olive oil or canola oil
½ fennel bulb, trimmed and thinly sliced vertically
3 large shallots, chopped
1.5 teaspoons salt
¾ teaspoon pepper
2 fresh thyme sprigs
1 bay leaf
3 cups vegetable stock or broth
½ cup red wine (optional)
4 large carrots, peeled and cut into 1 inch chunks
4 large red-skinned or white potatoes, peeled and cut into 1 inch chunks
18 small boiling onions, about 10 oz, halved crosswise
3 Portobello mushrooms cut into 1 inch chunks
1/3 cup finely chopped fresh flat-leaf (Italian) parsley
Directions:
Place the flour on a plate. Dredge the beef cubes in the
flour. In a large, heavy saucepan, heat the oil over medium heat. Add the beef
and cook, turning as needed, until browned on all sides, about 5 minutes. Remove
the beef from the pan with a slotted spoon and set aside.
Add the fennel and shallots to the pan over medium heat and
sauté until softened and lightly golden, 7-8 minutes. Add ½ teaspoon of the
salt, ¼ teaspoon of the pepper, the thyme sprigs, and the bay leaf, and sauté
for 1 minute. Return the beef to the pan and add the vegetable stock and the
wine, if using. Bring to boil, then reduce the heat to low, cover, and simmer
gently until the meat is tender, 40-45 minutes.
Add the carrots, potatoes, onions, and mushrooms. (The
liquid will not cover the vegetables completely, but more liquid will
accumulate as the mushrooms soften.) Simmer gently until the vegetable are
tender, about 30 minutes longer. Discard the thyme springs and bay leaf. Stir
in the parsley and the remaining 1 teaspoon salt and 1.2 teaspoon pepper.
Ladle into warmed individual bowls and serve immediately.
For what it is worth this recipe comes from The New Mayo
Clinic Cookbook so they provide some helpful information that I would like to
share with you.
This stew has three servings of veggies, one carb serving, and one protein serving.
There are 318 calories, 1,331 kilojoules, 21g protein, 36g carbs, 11g total fat, 3g saturated fat, 6g monounsaturated fat, 47mg cholesterol, 677mg sodium, 6g fiber.
There, now you know more than you ever wanted to know about this beef stew.
 |
| Giant Fennel |
 |
| More ingredients. |
 |
| Lots of prep work. |
 |
| Lots. |
 |
| I failed at getting a final picture but here it is about half done. |
---Dare to Cook---
Wednesday, August 8, 2012
The Battle of the Bread Machine (Not everything I do turns out well.)
So I bought a bread machine so I could make bread for sandwiches. However, when your bread turns out like this...
 |
| Oh I look like a hot mess!! |
 |
| Um yeah... |
---Dare to Cook---
Tuesday, July 31, 2012
Spit in the Eye
When you make a "spit in the eye" one of three things came happen.
 |
| The yolk can break in the pan... |
 |
| The yolk can break when you move it to the plate... |
 |
| OR it can actually turn out well! |
Making a spit in the eye, bird in a basket, or whatever else name you have heard is essentially just like making a fried egg. You want to butter the pan and let it heat up slightly. While the pan heats you can make your cut out in the bread. The bread goes in the pan first and then you crack the egg right into the cut out. I like to put the "doughnut hole" piece of the bread in the pan to toast up too. I personally cover my skillet with a lid to let the top of the egg steam so that I can reduce the risk of yolk destruction but as you can see from the pictures that doesn't always help.
Just be patient. If you can fry and egg then the spit in the eye should be almost as easy. And don't worry, you're not going to get it perfect every time but when you do it's a pretty great feeling to deliver to the table.
---Dare to Cook---
Friday, July 20, 2012
Dreamy Orange Creamy Pops
Dreamy Orange Creamy
Pops
I will have to admit. Mine didn’t turn out exactly as
anticipated. A few things led to this. The first being my apparent inability to
read “vanilla yogurt” because I saw “vanilla ice cream.” The second is that I
don’t have anything that can really crush ice too well; this lead to me leaving
out a lot of ice and thus ending up with a really strong orange flavored pop.
They still weren’t bad but I’ll have to wait until I can get a better blender
before attempting again.
Ingredients:
2 cups ice
1.5 cups vanilla yogurt
¾ cup frozen orange juice concentrate
½ cup milk
¼ teaspoon vanilla
Pop molds with lids
1.5 cups vanilla yogurt
¾ cup frozen orange juice concentrate
½ cup milk
¼ teaspoon vanilla
Pop molds with lids
Directions:
Combine ice, yogurt, orange juice concentrate, milk, and
vanilla in blender or food processors; blend until smooth.
Pour mixture into molds. Cover with lids, Freeze 6 hours or
until firm.
To remove pops from molds place bottoms of pops under warm
running water until loosened press firmly on bottoms to release. (Do not twist
or pull lids.)
 |
| Yum. |
---Dare to Cook---
Friday, July 6, 2012
Looking for Ideas
So in an effort to make this blog better I would like your feedback on a couple ideas I had. I know I have a few other aspects of this page that are still listed as "under construction" and trust me I have not forgotten about them! And I will complete them someday. As for the main blog page I have twoish ideas that I want some opinions on.
The first is guest blogger posts. I know I'm not the only one out there cooking in order to feed myself/my household. Would anyone like to be a guest blogger? You'd need to share the recipe, at least one picture (preferably of the final product), and a little narrative on what you did, maybe what you'd do differently next time, that kind of thing. You might even like to give a brief introduction of yourself the first time you submit something. If you are interested send me an email at kjfoodphotos@gmail.com.
The next idea is kind of an idea and a half. It started with the idea that I would do a post about the farm where I like to get my eggs but then it transformed into the idea to do posts that are more ABOUT food than strict recipes. The goal here being to get into a routine of posting something worth wild at least once a week. I have a couple fun books on dish origins and different cheeses. Like most people I do tend to fall into a pretty steady habit of a few "go to" recipes even though I try to do different things, sometimes those old favorites win out. So this type of post would help to provide some more variety as well as more information about food in general.
Again I would love your thoughts and feedback on these ideas and if you have ideas of what you'd like to see please let me know! You can either comment here or send me a message at kjfoodphotos@gmail.com
Thanks!
---Dare to Cook---
Thursday, July 5, 2012
A "Fruit" Pie
So when you think of pie what do you think of? Fruit pie? Well this is a kinda of fruit pie; tomatoes are a fruit you know!
For this pie I used Cherokee Purple Heirloom Tomatoes from the Hub City Farmer's Market.
You will need the following:
4 tomatoes, peeled and sliced
10 fresh basil leaves, chopped
1/2 cup chopped green onion
1 (9-inch) prebaked deep dish pie shell
1 cup grated mozzarella
1 cup grated cheddar
1 cup mayonnaise
salt and pepper
Directions:
Preheat oven to 350 degrees F.
Place the tomatoes in a colander in the sink in 1 layer. Sprinkle with salt and allow to drain for 10 minutes.
Layer the tomatoes slices, basil, and onion in pie shell. Season with salt and pepper. Combine the grated cheeses and mayonnaise together. Spread mixture on top of the tomatoes and bake for 30 minutes or until lightly browned.
To serve, cut into slices and serve warm.
In all honesty this was my first attempt at tomato pie and I don't think I drained the tomatoes right so my end product turned out really soupy.
---Date to Cook---
For this pie I used Cherokee Purple Heirloom Tomatoes from the Hub City Farmer's Market.
You will need the following:
4 tomatoes, peeled and sliced
10 fresh basil leaves, chopped
1/2 cup chopped green onion
1 (9-inch) prebaked deep dish pie shell
1 cup grated mozzarella
1 cup grated cheddar
1 cup mayonnaise
salt and pepper
Directions:
Preheat oven to 350 degrees F.
Place the tomatoes in a colander in the sink in 1 layer. Sprinkle with salt and allow to drain for 10 minutes.
Layer the tomatoes slices, basil, and onion in pie shell. Season with salt and pepper. Combine the grated cheeses and mayonnaise together. Spread mixture on top of the tomatoes and bake for 30 minutes or until lightly browned.
To serve, cut into slices and serve warm.
In all honesty this was my first attempt at tomato pie and I don't think I drained the tomatoes right so my end product turned out really soupy.
 |
| Tomatoes, yum! |
 |
| Basil all cut up and ready to go! |
 |
| Layer in the ingredients. |
 |
| Before and... |
 |
| ...after. |
 |
| And then it fell apart. |
---Date to Cook---
Friday, June 22, 2012
Pound Cake Toppers
Since we just learned how to make a pound cake from scratch let's figure out what we want to put on top if it!!
The first is simple. Strawberries and just a touch of sugar, in a sauce pan, over low heat. Now, grab your potato masher and just stir and mash until they are the consistency that you want. I can’t tell you how many strawberries or how much sugar because I just kind of threw stuff in the sauce pan when I did it. You can just put this sauce directly on to your slice of pound cake when it is time to eat.
The first is simple. Strawberries and just a touch of sugar, in a sauce pan, over low heat. Now, grab your potato masher and just stir and mash until they are the consistency that you want. I can’t tell you how many strawberries or how much sugar because I just kind of threw stuff in the sauce pan when I did it. You can just put this sauce directly on to your slice of pound cake when it is time to eat.
The second requires just a touch more work. You’ll need a
lemon from which you will need a teaspoon of lemon zest and 2.5 teaspoons of
freshly squeezed lemon juice. Add a pinch of salt (I think I left that out when
I made this) and work in six ounces of powdered sugar with a whisk in a couple
installments. You’re going to have to work quickly before the glaze sets. With
your cake on top of a plate or pan/cookie sheet to catch the drippings slowly
drizzle the glaze over the cake. Yummy!!
 |
| Ok so technically I came up with the strawberry sauce before I learned how to make the pound cake. |
 |
| But I assure you it is on top of the homemade cake in this picture!! |
I have not made the lemon glaze in a while so I will have to post a picture of it next time I do make it.
---Dare to Cook---
Thursday, June 21, 2012
Pound Cake
Pound cake. A recipe so easy that a written version did not
show up until 1847 (Good Eats, Season 13, A Pound of Cake).
Ingredients:
One pound of each of the following: room temperature butter,
sugar, eggs, flour, eggs
1 teaspoon vanilla
½ teaspoon (Kosher) salt
1 teaspoon vanilla
½ teaspoon (Kosher) salt
Directions:
You’re going to want to let the butter sit out for a couple
hours until it reaches around 65 degrees F. Divide up the butter and place it
onto of the sugar, this will keep the sugar from going everywhere. Cream the
butter and sugar together on medium for five minutes. Oh and a side note. I
strongly recommend Alton Brown’s recommendation that you use slow churn or
European style butter. I used butter that I bought from my local farmer’s
market.
Once you have your nice fluffy butter and sugar mixture work
in your pound of eggs. For regular market variety large chicken eggs you will
use about nine. Because I once again used food from my farmer’s market it took
me 11 eggs to get a pound. Either way you are going to want to work in your
eggs one at a time and do not drop another egg in until there are no signs left
of the pervious egg. If you don’t do this your batter will break. Now add your
vanilla and salt.
Finally it is time to work in the flour. Did I mention you
need to use cake flour? Well you do. Using cake flour will cause your cake to
be less chewy and cake flour will integrate faster into your batter. Keep the
speed on low and work in installments; preferably three. Keeping your flour in
a plastic cup or on a paper plate will help you get it into the bowl easier.
Once all the flour is in stop the mixer, scrap down the
sides, and then beat on medium for 30 second.
Now get out your food scale!! Place the loaf pan……oh wait. I
need to tell you about the loaf pan. Let’s back up a minute then. This recipe
is for two loaf pans. You’re going to want to butter and flour these loaf pans.
Now, where were we, oh yeah. Place the loaf pan on your food scale and if it is
super cool it will have a “tear” button. This will subtract the weight of the
pan. Now, pour batter into the pan until it hits two pounds. The rest goes in
the other pan! Hooray!!
Now into a 350 degree F oven for about an hour until the
inside of the cake reads 210 degree F on your handy dandy probe thermometer.
Take the cakes out and place them, still in the pans, on a cooling rack for 10
minutes before depaning. After depaning let it rest on the cooling rack for
another 10 minutes before serving.
Enjoy!
 |
| The batter gets really fluffy looking! |
 |
| Two pounds in each pan please! |
 |
| Yum. |
---Dare to Cook---
Sunday, June 17, 2012
Chicken Thing
Who is ready for a quick and easy chicken recipe? I got a couple recipes to post but here is a short one to hold you over while I get the others typed up and ready.
Put four (4) boneless skinless chicken breasts in a crockpot. In a bowl mix a 10.75oz can of cream of chicken soup with 1/3 cup of milk and pour over the chicken. In another bowl mix a 6 ox box of stuffing (I use the one labeled "chicken") with 1 and 2/3 cups of water and spoon over the chicken and soup. Cover and cook on low for 6 to 8 hours.
Makes four servings.
---Dare to Cook---
Edited to add picture 7/5/12
Put four (4) boneless skinless chicken breasts in a crockpot. In a bowl mix a 10.75oz can of cream of chicken soup with 1/3 cup of milk and pour over the chicken. In another bowl mix a 6 ox box of stuffing (I use the one labeled "chicken") with 1 and 2/3 cups of water and spoon over the chicken and soup. Cover and cook on low for 6 to 8 hours.
Makes four servings.
 |
| Serve one of the chicken breasts with the stuffing piled on top! |
---Dare to Cook---
Edited to add picture 7/5/12
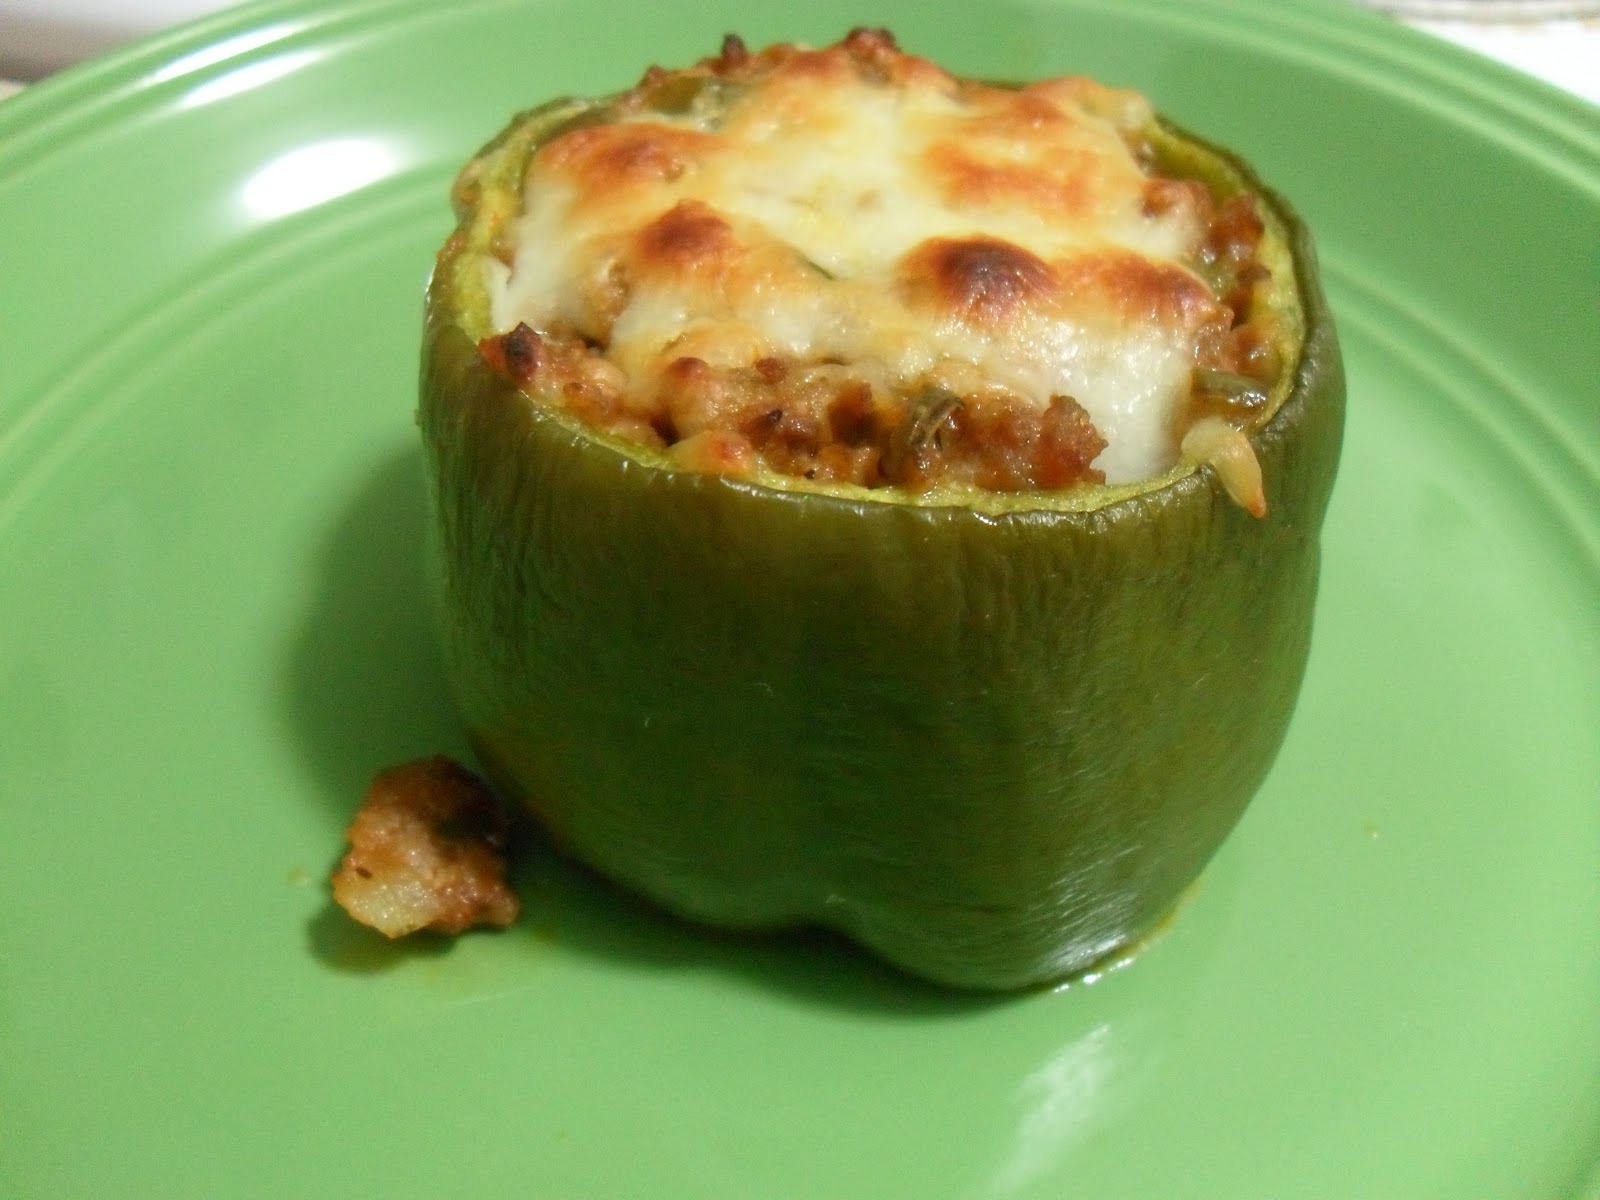
Monday, March 26, 2012
Stuffed Peppers
Not sure what got into me the last few weeks but I had it in my head that I was going to make stuffed peppers. I have this feeling it was because my mom told me she made some a while back and I thought it would be a good way to get some move veggie in my diet. (Diet here being how you eat as a whole, not something you do for a month before you go to a wedding or reunion.)
Thank you once again to Pintrest I found many stuffed pepper recipes but I went with the one below.
Here is the original website and the original recipe and then I'll tell you what I did differently after the pictures.
This makes six stuffed peppers.
Ingredients:
6 red or green peppers, or a mixture of colors
1 pound extra lean ground beef (called beef mince outside of the U.S.)
1 pkg. (5 links/19.5 oz) turkey Italian sausage (hot or mild, but I prefer hot)
1 cup diced onion (1 medium onion)
1 cup diced red pepper (tops of peppers)
4-6 tsp. olive oil for browning meat and veggies
Vege-sal to season meat (or use salt)
fresh ground black pepper, to season meat
1 cup (or slightly more) spicy tomato sauce with basil (I use my own Marinara sauce from the freezer so I know it is sugar free. Bottled sauce is fine, but check the label to get the one that is lowest in sugar.)
2 cups grated low fat mozzarella cheese (I used skim milk mozzarella cheese with 5 grams fat per ounce)
1/2 cup grated Parmesan (optional, you could use a little less mozzarella if adding this)
Instructions:
Preheat oven to 375F/190C. Cut tops off peppers, making a deep enough cut that you have some pepper to chop for the filling. Square off the bottom of each pepper to make them stand up. (It's nice to have a small hole in the bottom so any extra fat can drain out, and cutting off the bottoms also accomplishes this.) Clean out inside of peppers and wash if needed. Choose a pan that will keep the peppers standing upright and spray with olive oil or nonstick spray.
In very large frying pan, heat a small amount of olive oil and cook hamburger until lightly browned. (I use my turner or a potato masher to break up the meat into smaller bits as it cooks.) Put the browned meat in a colander or fine-mesh strainer, rinse with very hot water to remove fat, and let drain. In same frying pan, add a tiny amount of olive oil, squeeze turkey sausage out of links, and cook until lightly brown. Add to hamburger in colander and rinse again.
Add a bit more oil to pan and cook chopped peppers and onions for about 3-4 minutes, until barely starting to soften. Turn off heat and put meat back into pan with peppers and onions. Add about 1 cup tomato sauce, just enough to barely moisten the mixture. Season mixture with salt and pepper to taste. Let mixture cool slightly, then mix in cheeses, saving about 1/4 cup Mozzarella for the top of the peppers.
Put the peppers in the pan standing upright. Stuff each pepper with meat/veggie/cheese mixture, using a large spoon and pressing in tightly until you use all the filling. Put a pinch of Mozzarella cheese on the top of each pepper. Cover the dish loosely with foil, tenting it up so it doesn't touch the tops of the peppers.
Bake, covered with foil about 30 minutes. Take off foil and bake about 20 minutes more, until cheese is melted completely and top is slightly browned. Serve hot.
This freezes well, so even if you're only cooking for one or two I recommend making the full amount and stashing some in the freezer for lunches or easy dinners another time.


Now to use up some stuff that I had in the freezer, I used some local beef from the farmers market so I'm pretty sure the fat content was higher than the original recipe but the cows grew up about 30 minutes from where I live and were 100% grass fed; the way meat is suppose to be. And instead of using turkey sausage I still had some Johnsonville Italian sausage in the freezer so I used it. I also didn't rinse my meat after cooking it cause fat is flavor and I wanted the flavor in my dinner, not down the drain.
Like the recipe suggest I did cut the bottoms off of my peppers but in some cases I went a little over board so a couple peppers didn't really have bottoms but it's ok cause the meant still stuck together and you're going to cut the thing up to eat it anyway.
I also only used green peppers instead of a mix of red and green because I liked the look of the green peppers at Bi-Lo better.
I do have to say this. I am not a huge fan of pepper, or at least raw peppers, so the idea that I had a hankering for these was strange enough. The fact that they were so yummy that I am going to add them into my recipe book is even more bazaar. If you're more worried about the dish's fat content that you are about cleaning out your freezer than shop around for the lean beef and the turkey sausage. Me? I wanted to be a bit frugal this time.
Thank you once again to Pintrest I found many stuffed pepper recipes but I went with the one below.
Here is the original website and the original recipe and then I'll tell you what I did differently after the pictures.
Stuffed Peppers Recipe with Turkey Italian Sausage, Ground Beef, and Mozzarella
This makes six stuffed peppers.
Ingredients:
6 red or green peppers, or a mixture of colors
1 pound extra lean ground beef (called beef mince outside of the U.S.)
1 pkg. (5 links/19.5 oz) turkey Italian sausage (hot or mild, but I prefer hot)
1 cup diced onion (1 medium onion)
1 cup diced red pepper (tops of peppers)
4-6 tsp. olive oil for browning meat and veggies
Vege-sal to season meat (or use salt)
fresh ground black pepper, to season meat
1 cup (or slightly more) spicy tomato sauce with basil (I use my own Marinara sauce from the freezer so I know it is sugar free. Bottled sauce is fine, but check the label to get the one that is lowest in sugar.)
2 cups grated low fat mozzarella cheese (I used skim milk mozzarella cheese with 5 grams fat per ounce)
1/2 cup grated Parmesan (optional, you could use a little less mozzarella if adding this)
Instructions:
Preheat oven to 375F/190C. Cut tops off peppers, making a deep enough cut that you have some pepper to chop for the filling. Square off the bottom of each pepper to make them stand up. (It's nice to have a small hole in the bottom so any extra fat can drain out, and cutting off the bottoms also accomplishes this.) Clean out inside of peppers and wash if needed. Choose a pan that will keep the peppers standing upright and spray with olive oil or nonstick spray.
In very large frying pan, heat a small amount of olive oil and cook hamburger until lightly browned. (I use my turner or a potato masher to break up the meat into smaller bits as it cooks.) Put the browned meat in a colander or fine-mesh strainer, rinse with very hot water to remove fat, and let drain. In same frying pan, add a tiny amount of olive oil, squeeze turkey sausage out of links, and cook until lightly brown. Add to hamburger in colander and rinse again.
Add a bit more oil to pan and cook chopped peppers and onions for about 3-4 minutes, until barely starting to soften. Turn off heat and put meat back into pan with peppers and onions. Add about 1 cup tomato sauce, just enough to barely moisten the mixture. Season mixture with salt and pepper to taste. Let mixture cool slightly, then mix in cheeses, saving about 1/4 cup Mozzarella for the top of the peppers.
Put the peppers in the pan standing upright. Stuff each pepper with meat/veggie/cheese mixture, using a large spoon and pressing in tightly until you use all the filling. Put a pinch of Mozzarella cheese on the top of each pepper. Cover the dish loosely with foil, tenting it up so it doesn't touch the tops of the peppers.
Bake, covered with foil about 30 minutes. Take off foil and bake about 20 minutes more, until cheese is melted completely and top is slightly browned. Serve hot.
This freezes well, so even if you're only cooking for one or two I recommend making the full amount and stashing some in the freezer for lunches or easy dinners another time.

Now to use up some stuff that I had in the freezer, I used some local beef from the farmers market so I'm pretty sure the fat content was higher than the original recipe but the cows grew up about 30 minutes from where I live and were 100% grass fed; the way meat is suppose to be. And instead of using turkey sausage I still had some Johnsonville Italian sausage in the freezer so I used it. I also didn't rinse my meat after cooking it cause fat is flavor and I wanted the flavor in my dinner, not down the drain.
Like the recipe suggest I did cut the bottoms off of my peppers but in some cases I went a little over board so a couple peppers didn't really have bottoms but it's ok cause the meant still stuck together and you're going to cut the thing up to eat it anyway.
I also only used green peppers instead of a mix of red and green because I liked the look of the green peppers at Bi-Lo better.
I do have to say this. I am not a huge fan of pepper, or at least raw peppers, so the idea that I had a hankering for these was strange enough. The fact that they were so yummy that I am going to add them into my recipe book is even more bazaar. If you're more worried about the dish's fat content that you are about cleaning out your freezer than shop around for the lean beef and the turkey sausage. Me? I wanted to be a bit frugal this time.
Friday, March 23, 2012
Devilish Chocolate Cola Cake
I have been making this cake since high school and it is always a hit, especially with chocolate lovers. I am also going to go ahead and admit that this picture is not from the last time I made this cake, it is from the time before that. I really didn’t like how the frosting turned out this last time so I am using an older picture. Usually when I make this cake the frosting is more of a glaze and this time it really was more of a frosting. I believe what happened was the butter used was starting to cool off thus making the topping thinker and causing it to be a frosting consistency rather than a glaze consistency. Either way it is really yummy but I prefer the glaze topping. (Oh and yes, the ice cream in the picture is also home made. I’ll post an ice cream recipe in a few weeks once I have the time to make some.)
Chocolate Cola Cake
Cake:
One 18.25 ounce package Devil’s Food Cake Mix without pudding
One 3.9-ounce package Chocolate instant pudding
4 large eggs
One 10 ounce bottle cola flavored beverage (1-1/4 cups)
Preheat oven to 350F. Combine first 4 ingredients in a bowl. Beat at low speed with an electric mixer until blended; set aside. Bring cola to a boil in a small sauce pan over medium heat. With mixer on low speed, gradually pour hot cola into cake batter. Increase speed to medium, beat 2 minutes. Pour batter into a greased and floured 9 x 13 x 2 inch baking pan. Bake for 30 minutes, or until a wooden pick inserted in center comes out clean. Cool in pan on wire rack 10 minutes. Spread chocolate-cola frosting over top of warm cake, cool cake completely on wire rack.
Frosting:
1/2 cup butter or margarine
6 tablespoons Cola-flavored carbonated beverage
3 tablespoons cocoa
One 16-ounce package powdered sugar, sifted
1 teaspoon vanilla extract
1 cup chopped pecans
6 tablespoons Cola-flavored carbonated beverage
3 tablespoons cocoa
One 16-ounce package powdered sugar, sifted
1 teaspoon vanilla extract
1 cup chopped pecans
Combine first 3 ingredients in a large sauce pan; cook over medium heat, stirring constantly until butter melts. (Do not boil). Remove from heat. Add powdered sugar and vanilla, stirring until smooth. Stir in pecans. Spread on warm cake.
Serves 15.
Really the pecans are optional. I've made it without before, so if you have an allergy or if you just don't like nuts in your dessert feel free to leave them out! I love pecans though and sometimes I add a little more than what is called for.

---Dare to Cook---
Monday, March 12, 2012
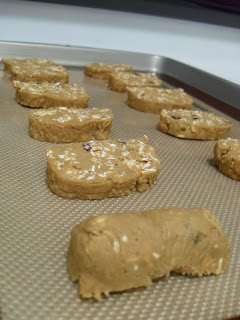
Breakfast Cookies
These delicious lovelies are from a book called The Athlete's Palate Cookbook. My brother gave it to me a couple Christmases ago when I was really starting to get active and watch what I eat. The recipe in the book is called Quinoa Cookies but since they are in the breakfast part of the book and that is when I will be eating them, I have named them Breakfast Cookies. You call them whatever you want.
This recipe makes about two dozen (24) cookies. I made 23, oops.
Ingredients:
1/2 cup butter
1/2 cup brown sugar
1 egg, beaten
1/2 cup unbleached or all-purpose flour
1/2 quinoa flour
1/4 teaspoon salt
1/2 teaspoon baking soda
1/2 cup regular oats (not instant)
1/2 cup fruit granola
Directions:
Cream the butter and brown sugar. Combine the vanilla and egg and add to the butter mixture. Sift the flours, salt, and baking soda and fold into the butter mixture. Fold in the oats and granola.
Roll the dough into a log shape (I found putting on a rubber glove at this point helped a lot) about 1.5 to 2 inches in diameter using plastic wrap. Freeze for 20 minutes or until firm enough to slice. When you're ready to take it out of the freezer, pre-heat the oven to 350F. Slice dough into 1/2 inch rounds. Place on a lightly greased baking sheet; you can also use parchment paper or a reusable silicone baking mat like I do. Bake 15 to 20 minutes, or until crispy on the outside but still moist on the inside.
Each cookie does have about 100 calories but they are from an athlete cookbook and they are meant for breakfast so they will give you that boost in the morning.


---Dare to Cook---
Navajo Beef and Chile Stew - Crockpot
Who wants more crockpot cooking? I DO!!
This one is from a healthy crockpot cookbook. I used the prep-a-head-and-freeze method for this recipe.
3/4 pound lean beef stew meat, cut into 3/4-inch cubes
1 large onion, chopped
2 large cloves garlic, minced
1 (14.5oz) can of ready-cut tomatoes with juice
1 (7oz) can diced green chiles, drained
1 (8.5oz) can whole-kernel corn, undrained
1.5 teaspoons dried oregano leaves, crushed
1 teaspoon ground cumin
1/2 teaspoon salt
1/4 teaspoon ground red pepper
2 tablespoons yellow cornmeal
Combine all ingredients, except cornmeal, in a 3.5 quart slow cooker, mixing well. Cover and cook on low 7 to 8 hours or until meat is tender.
Turn control to high. Stir in cornmeal. Cover and cook on high 20 to 25 minutes.
Approx 292 calories per serving, too bad the book doesn't tell you how much a serving size is.
I actual like to pear it with mashed potatoes. Yum!

---Dare to Cook---
Friday, March 2, 2012
Mini Corn Dog Muffins
The original recipe calls them Corn Dog Mini Muffins but for some reason Mini Corn Dog Muffins sounded better to me so that's what I have been calling them.
Here is the link to the original recipe. (I'm trying to do this whenever possible now so that I know people are getting credit.) http://happygoodtime.com/2012/02/01/corn-dog-mini-muffins/
Just so you know. If you couldn’t tell, you will need a mini muffin pan.
Ingredients:
§ 1 package mini hot dogs or regular hot dogs cut into 1 inch pieces. Make sure you get fully cooked hotdogs or you cook them before hand. I also made some with veggie dogs so that they would be a vegetarian option.
For the cornbread mix:
§ 1 cup all purpose flour
§ 1 cup cornmeal
§ 1 tablespoon baking powder
§ 2 eggs
§ 1 cup milk
§ 1/3 cup unsweetened applesauce (vegetable oil or butter as a substitution are fine)
§ 1/4 cup sugar
§ 1/4 teaspoon salt
Directions:
§ Pre-heat your oven to 400 degrees F
§ In a large mixing bowl stir together flour, cornmeal, salt, and baking powder
§ In a separate bowl whisk together eggs, milk, applesauce and sugar
§ Gently mix together wet and dry ingredients, stirring only to coat. Be careful not to over mix here or you will have tough, dry muffins. Just like with biscuits/scones the key is to be gentle with the batter. There will be small lumps in your batter, and that is perfectly fine.
§ Prepare your muffin tin by spraying liberally with cooking spray. If your pan has the tendency to stick, consider using mini muffin liners.
§ Using a tablespoon, fill each muffin cup 3/4 full. Be sure not to fill all the way to the top.
§ Insert 1 hot dog piece into each muffin
§ Bake at 400 F in the center of your oven for 10-15 minutes or until a toothpick inserted in the middle of a muffin comes out clean
§ Remove from pan while still very warm to avoid over-cooking
Here is a little tip based on what I did. Since I was making these for a party that I had to travel close to an hour to and I didn’t want these little beauties to be cold by the time I got there, after I mixed the batter I put it in a zip top bag for travel. I also went ahead and cut all the hot dog and veggie dog pieces before I got on the road and put them in zip top baggies too (labeled meat and veggie of course). When I got to where I was going having the batter in a baggie really helped with filling the muffin pan. I just snipped the corner off and basically used it as a piping bag to fill each muffin space. When they were done I simply used two forks to pull each muffin out of the pan. And since this recipe makes 28 and my pan only holds 24 I had to make four more and put the pan back in the oven. But all the work was worth it because these little lovely are simply yummy. Serve with whatever you’d put on a corn dog. I stuck to ketchup and mustard even though most of the people eating them didn’t use any. They are just that good. Ha!


 |
| Yummy!! |
---Dare to Cook---
Monday, February 27, 2012
King Cake Cup Cakes
Fat Tuesday was last week and you know what that means.................
KING CAKE!!!
I wanted something I could easily take to work to share and I came across these beauties on Pintrest.
Here is the link to the original recipe: King Cake Cup Cakes
And here is the recipe. I know it looks like a lot but I had fun making them. But I'm pretty sure mine were WAY messier than they were suppose to be. Maybe my cream cheese was too soft or I tried to put in too much filling. I don't know. They were still really good though!!
---Dare to Cook---
KING CAKE!!!
I wanted something I could easily take to work to share and I came across these beauties on Pintrest.
Here is the link to the original recipe: King Cake Cup Cakes
And here is the recipe. I know it looks like a lot but I had fun making them. But I'm pretty sure mine were WAY messier than they were suppose to be. Maybe my cream cheese was too soft or I tried to put in too much filling. I don't know. They were still really good though!!
Ingredients
For the dough:
1 cup warm water
1/4 cup sugar, divided
1 pkg (2 1/4 tsp) yeast
1 egg
1 egg yolk
4 Tbsp butter, melted
3 1/2 cups flour, plus more for dusting work surface
1 tsp salt
Oil or cooking spray, for coating bowl
For the cream cheese filling:
8 oz cream cheese, softened (I used reduced-fat)
1/4 cup + 2 Tbsp sugar
1 egg yolk
1 tsp vanilla
1/2 rounded tsp cinnamon
2 Tbsp melted butter
For the glaze:
3/4 cup powdered sugar
1/2 tsp vanilla
3-4 tsp water
Decorating sugar in yellow, purple and green
Instructions
- Add water and 1 Tbsp sugar to the bowl of your stand mixer. Sprinkle yeast over top and let stand for 10 minutes. (If your yeast doesn't get puffy, don't keep going - buy new yeast.)
- Add melted butter, egg, egg yolk, remaining sugar, 3 cups flour, and salt, and then turn the mixer to low.
- Add only enough extra flour to get the dough to clean the sides of the bowl but not come completely off the bottom - it should be only slightly sticky when you touch it.
- Transfer to a lightly oiled bowl, cover, and let rise in a warm place until doubled (45 minutes-1 hour in my 100-degree oven). While dough is rising, make the filling.
- Place filling ingredients into the mixer bowl (minus the melted butter) and mix on medium-high until completely smooth, 1-2 minutes.
- Preheat oven to 375 and line 2 cupcake pans with 18 liners.
- Turn dough out onto a lightly floured surface and knead a few times.
- Stretch to a rectangle about 18x12 and brush with 2 Tbsp melted butter, leaving the top 1-inch dry.
- Spread cream cheese filling over the dough evenly, leaving the top 1-inch dry.
- Starting with the long side of the dough closest to you, roll jelly-roll style, pinching the last inch of the dough onto the roll and placing seam-down on the counter.
- Lightly pat/pull so that the roll is even diameter down its length.
- Trim the scraggly ends and then slice into rounds that are ~3/4-1 inch thick. Take care that they don't get any thicker than that, the rolls should sit level/just below level of the cupcake pan. Any taller and they'll grow too tall in the oven and fall over.
- Transfer the rounds to the cupcake pans and let rest while the oven preheats to 375.
- Bake ~25 minutes, until lightly browned and nicely domed.
- Remove from the oven and let cool ~10 minutes in the pan.
- Transfer to a rack to cool completely.
- To make the glaze, whisk powdered sugar, vanilla, and gradually add the water until you get a smooth and thick but scoopable glaze.
- Dip the tops of the cupcakes in the glaze (or spoon over top) and then sprinkle with decorating sugar. Like cinnamon rolls, they're best in the first 2 days. If you're bringing them to a party, ice/sugar them the night before. When stored in an airtight container for much longer than that, the sugar and glaze will begin to melt from the pastry moisture. Delicious still, just not as cute.
Yields: 18 cupcakes
 |
| Apparently I wasn't the only one at work who was thinking King Cake. |
 |
| But I am the only one who brought beads straight from NOLA. |
---Dare to Cook---
Southwestern Chicken and Black Bean Skillet
This is one of those recipes that at first I read and thought "man, I don't like that or that. I hope this tastes good." And I am so glad I made it!! This will probably be one of my "go to recipes" from now on!!!
Southwestern Chicken and Black Bean Skillet
1 teaspoon ground cumin
1 teaspoon chili powder
½ teaspoon salt
4 boneless skinless chicken breasts (about 1 point)
2 teaspoon canola oil
1 cup chopped onion
1 red bell pepper, chopped
1 can (about 15 oz) black beans, rinsed and drained
½ cup chunky salsa
¼ cup fresh cilantro or thinly sliced green onions (optional)
1 teaspoon chili powder
½ teaspoon salt
4 boneless skinless chicken breasts (about 1 point)
2 teaspoon canola oil
1 cup chopped onion
1 red bell pepper, chopped
1 can (about 15 oz) black beans, rinsed and drained
½ cup chunky salsa
¼ cup fresh cilantro or thinly sliced green onions (optional)
- Combine cumin, chili powder, and salt in a small bowl; sprinkle over both sides of the chicken.
- Heat the oil in a large nonstick skillet over medium-high heat. Add chicken; cook 4 minutes, turning once. Remove to plate.
- Add onion to same skillet’ cook and stir 1 minute. Add bell pepper; cook 5 minutes, stirring occasionally. Stir in beans and salsa.
- Place chicken on top of bean mixture. Cover and cook 6 to 7 minutes or until chicken is no longer pink in center. Garnish with cilantro.
Makes 4 servings.
And according to the book I got this from it is ONLY 262 CALORIES!!
I haven't tried it yet but I be these left overs would make good nachos too!!
 |
| Yum! |
 |
| Not my most fancy plating every but highly effective. |
---Dare to Cook---
Subscribe to:
Posts (Atom)